
How to Paint PERFECT..ly Decent Eyes
By Randall Miller
Here We have our first article from Randall! Randall is the creator of the Imperial Minis YouTube Channel and he graciously put forward this awesome article to the website. We hope you really enjoy it, like we all did. Check out the Imperial Minis YouTube Channel for some more Randall related content.
Many cultures consider eyes to be the windows to the soul. Eyes are one of the first things about a person that we notice upon meeting them and, they are so significant to human interaction that, in Western culture at least, it is considered uncouth not to look a person in the eyes when speaking with them. While eyes may culturally be the windows to the soul, in the wargaming hobby eyes are the bane of many painters’ existence. To competently paint eyes on a small miniature is a sign of a certain level of proficiency; a veritable hobby rite of passage. This is a rite that I avoided for several years, until finally confronting it, practicing at it, and feeling comfortable enough with it that I present my preferred method here, for the benefit and scrutiny of all my fellow ocularly- disinclined painters.
I am relatively new to the wargaming hobby, having started only during the COVID period of 2020. I am not new to painting, but in my previous years of scale model painting experience, I never bothered painting eyes on scale model soldiers. On the few occasions I did try, I left comical bug-eye expressions in my wake.
When I picked up the wargaming hobby, I began playing Star Wars: Legion. This game offered me ample opportunities to continue pretending eyes didn’t exist on miniatures. I naturally chose the robotic Separatist faction and the mostly helmet-covered Empire as my factions of choice. Eventually, I switched over to the game, A Song of Ice & Fire, and was confronted with the horrifying reality that I would have to paint infantry trays of twelve miniatures, many of whom did in fact have eyes.
Necessity, being the mother of invention, required me to quickly come up with a way to efficiently paint perfectly decent eyes. Here we are today, hundreds of pairs of painted eyes later, with a technique I will share with you all. I hope that it will broaden the painting horizons of some readers, and perhaps teach an alternate technique to those more experienced among you.

This technique is a four-step process, but it assumes that you have already prepared the face for the painting of the eyes with a base flesh tone. The painting of the base coat can be done with whichever paints you prefer, but my two-step technique for that is as follows:
1. Base coat the face with two thin layers of Scalecolor Pink Flesh (or whichever pink fleshy skin color you prefer). If you’re painting a different skintone than Caucasian skin, use whichever colors you prefer. If I am beginning with more of a tan or mediterranean skin tone, I will add some Scalecolor Arabic Shadow to each of the Caucasian skin colors as I go, and it gives a good result.
2. Once the basecoat is fully dry, I cover the skin in Citadel’s Reikland Fleshshade to fill in all the recesses, establishing all our shadows, and giving us a more clear idea of where the eyes are on the mini. It can be hard to see where the eyelids are when you’re just looking at the base coat alone. You can use whatever kind of flesh wash you’re comfortable with if you don’t have Reikland Fleshshade.
Before getting started, you’re going to want to have the following painting supplies and paints on-hand:
1. A fine-tipped brush
2. Near-sighted eyes, or a good set of modelling glasses/magnifying lenses
3. Paints
a. Base Flesh Tone – I use Scale 75 Pink Flesh
b. Flesh Wash – I use Citadel Reikland Fleshshade
c. Medium Brown – I use Vallejo Chocolate Brown
d. Off-White – I use a mix of Ivory with a splash of light grey or tan
e. Your preferred iris color for the eyes (I usually go back to Chocolate Brown)
f. (optional) A bottle of glaze medium, paint retarder, or similar product
4. Intangible assets: a steady or braced hand, patience, and a sense of adventure

Now we get on to the first step of this technique! This technique is, at its core, a slap- dash use of blotches and lines that are cleaned up later in the highlighting step of your face painting. Warning up-front: your mini’s face will likely look like a clown before it ultimately looks like Prince Charming (or Prince Charming’s homely friend from school he still keeps in touch with out of pity).
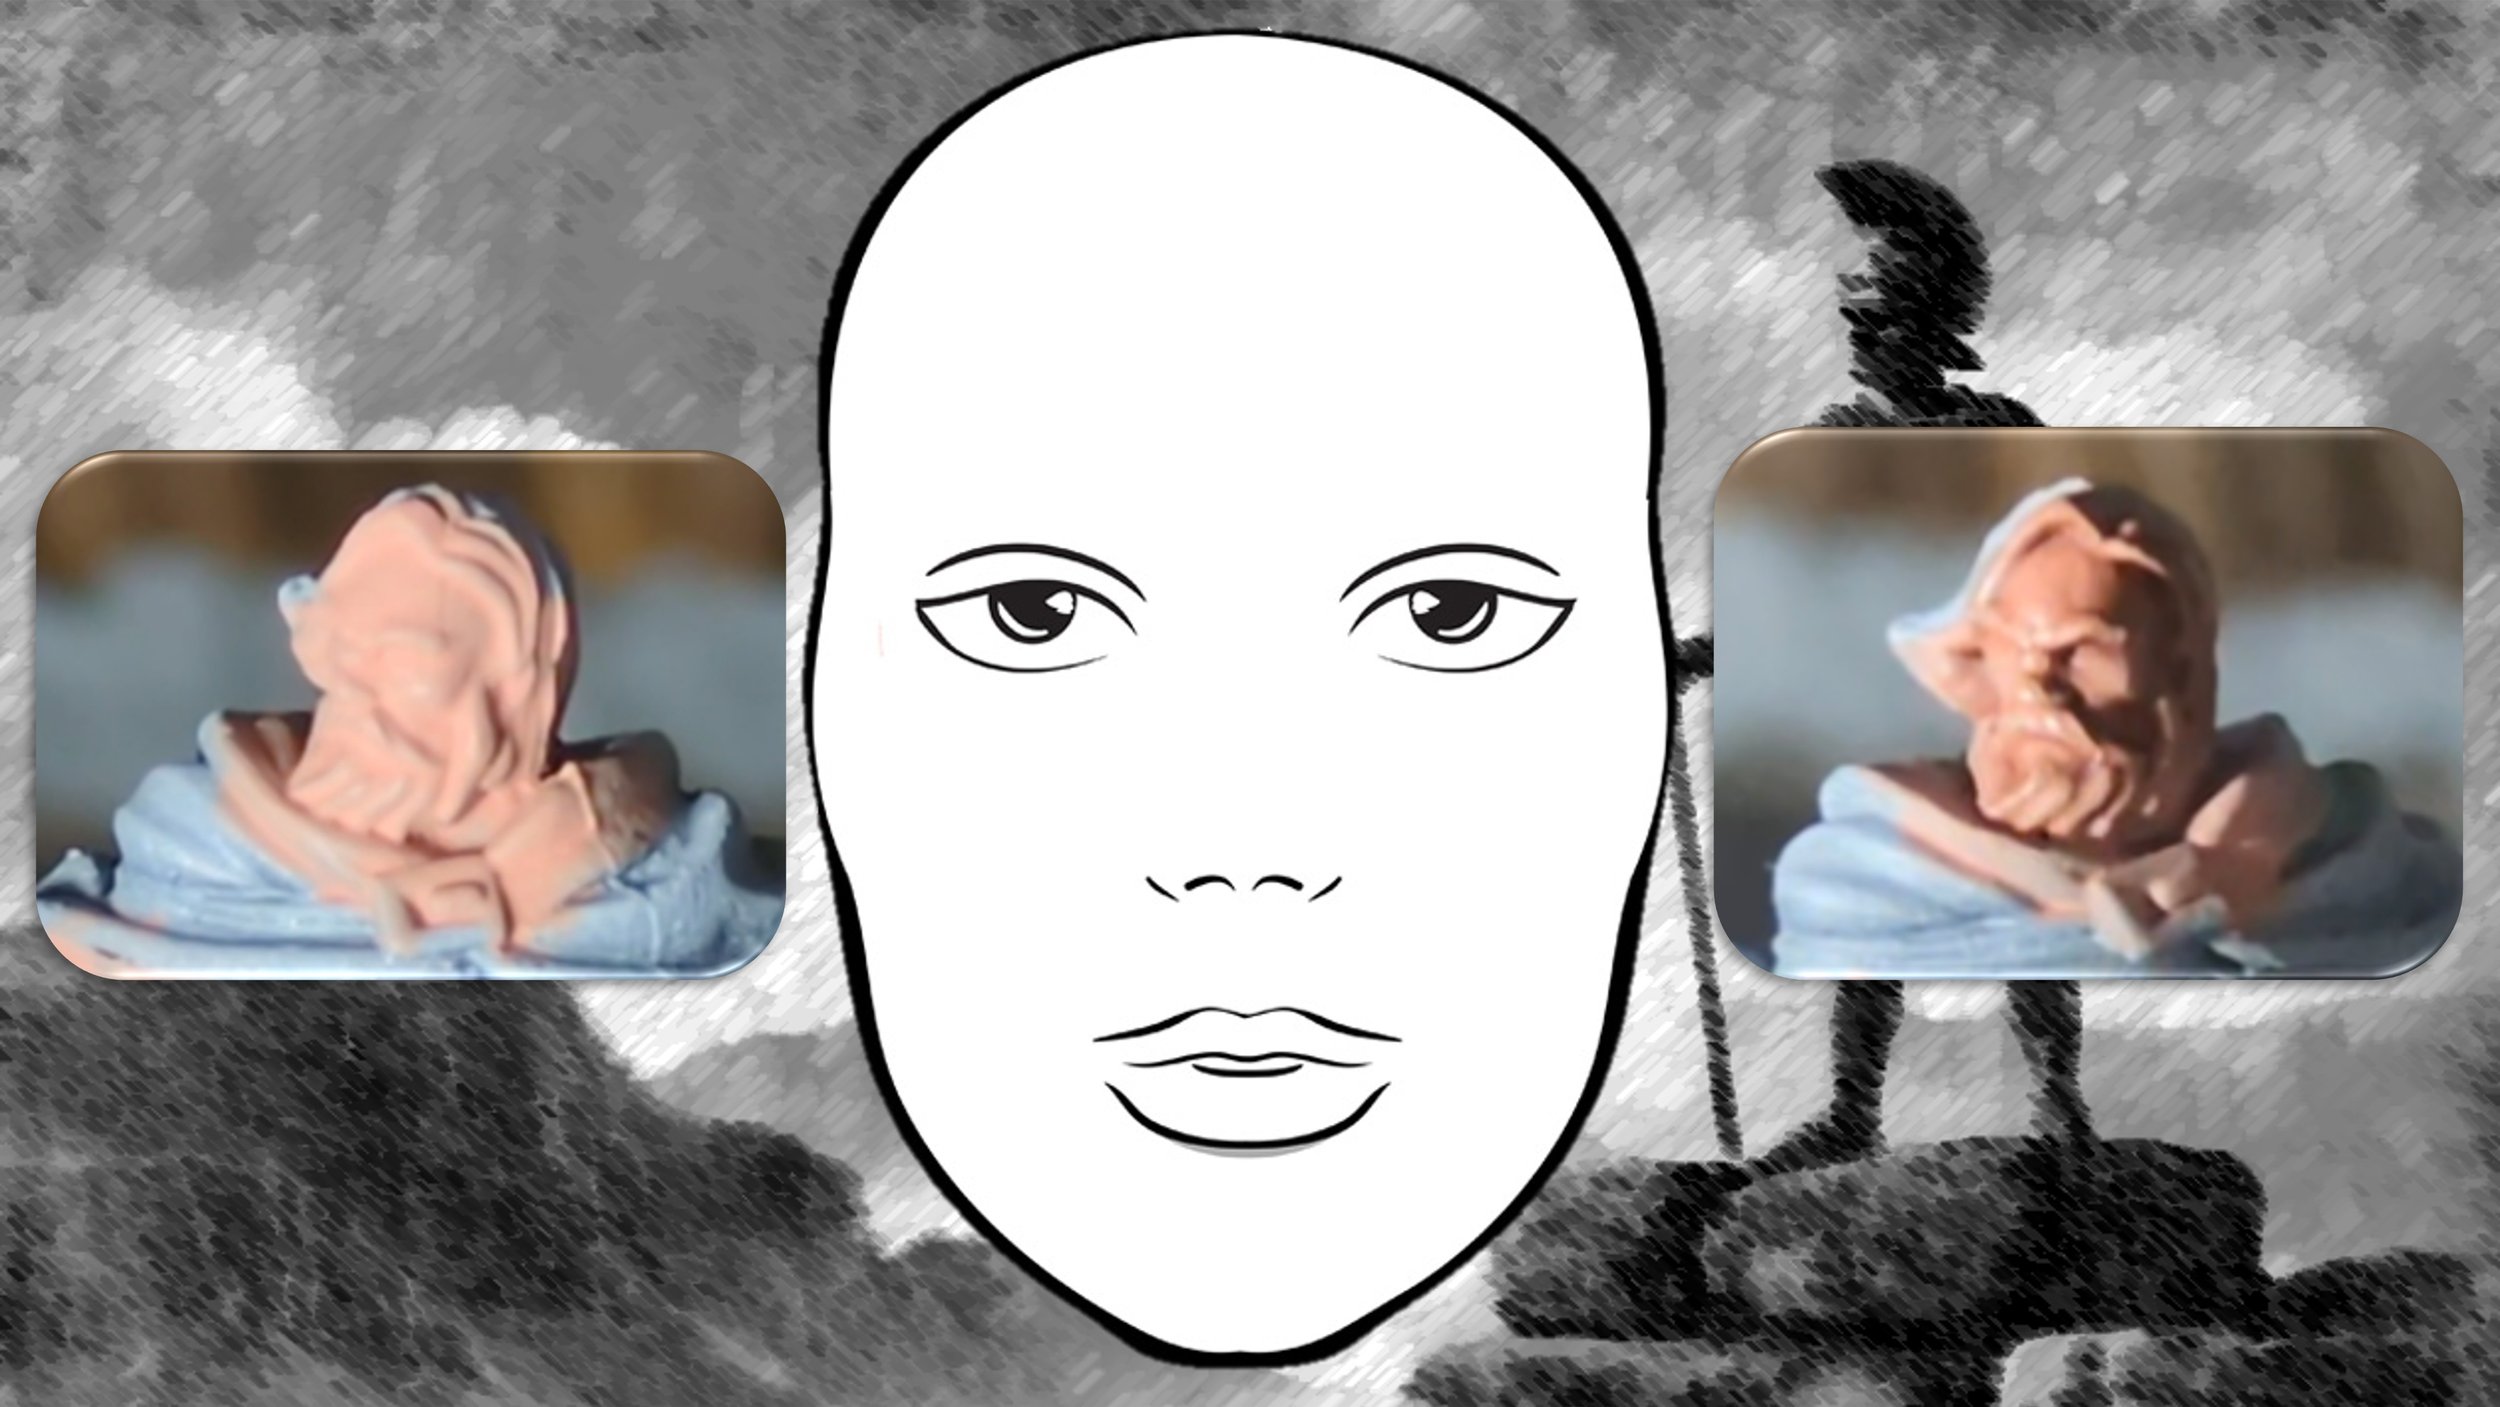
Step One: Brown Eye Socket Blotches!
The first step involves creating an eye socket that will give the illusion of depth and shadow to your eyes. An eye would look pretty flat and unnatural if there were no transition between flesh tone and the white of the eyes. Using your preferred shade of medium-dark brown (Vallejo Chocolate Brown for me), you’ll get just enough paint on your brush to paint a fine line. Too much paint on the tip of your brush will leave your mini’s eye socket flooded with a sudden gush of paint, and then you may have to start the whole base coating process all over again.
***PAINTING HACK*** If you want to give your paints more workable time on the mini and therefore also afford yourself extra time to easily remove excess paint with a damp paint-brush, I recommend adding a small amount of glaze medium or retarder to your paints during this eye-painting process. A little goes a long way. If you make a big mistake during this process, you can simply grab another damp brush and wipe away the excess paint without having to repaint your base coat. Doing this will require more drying time between steps, but I find it useful to give yourself more time to clean up mistakes as you go. This will also help make you less nervous and less prone to making jerky paint strokes. Now, back to our regularly scheduled tutorial…
Now that you have a little bit of Brown paint on your brush, you’ll want to turn your mini’s head in such a way that you can conveniently and comfortably paint a little blotchy brown line across each of the eyes. You need not be super careful here, since the center of that blotch will soon be painted white, and the outer edges of that blotch will eventually be re-highlighted with your base flesh tone.

Step Two: Off-white Eyeball Blotches!
This next set of blotches will ideally be ever-so-slightly smaller than the brown blotches that preceded them. If these eyeball blotches are slightly smaller, it will eventually give the impression that the eyeballs are seated in eye sockets or are in the shadow provided by the mini’s brow.
Now, for the color of your eye-balls there’s only one rule: do not paint them pure white! Have you ever seen someone with pure white eyeballs, outside of a cartoon? There’s such a subtle color difference between white and off-white, but the effect on a miniature is profound. Find yourself an out-of-the bottle solution if you can, like an off-white, a deck-tan, or something similar. If you don’t have a paint for this purpose, you can always easily make one by mixing a small amount of grey or tan into white. The painting process for this step is very similar to Step One, except that your blotch should be slightly smaller. You’ll still want to hold your miniature in such a way that the tip of your paint brush is parallel to the eyebrows and just ever-so- gently place the tip into the center of your brown blotch. If you paint your white blotch a little bit too big and, if you’ve added some medium to your off-white, you can now take a damp brush and gently tease the edges of your white blotch to bring them back to an acceptable size.

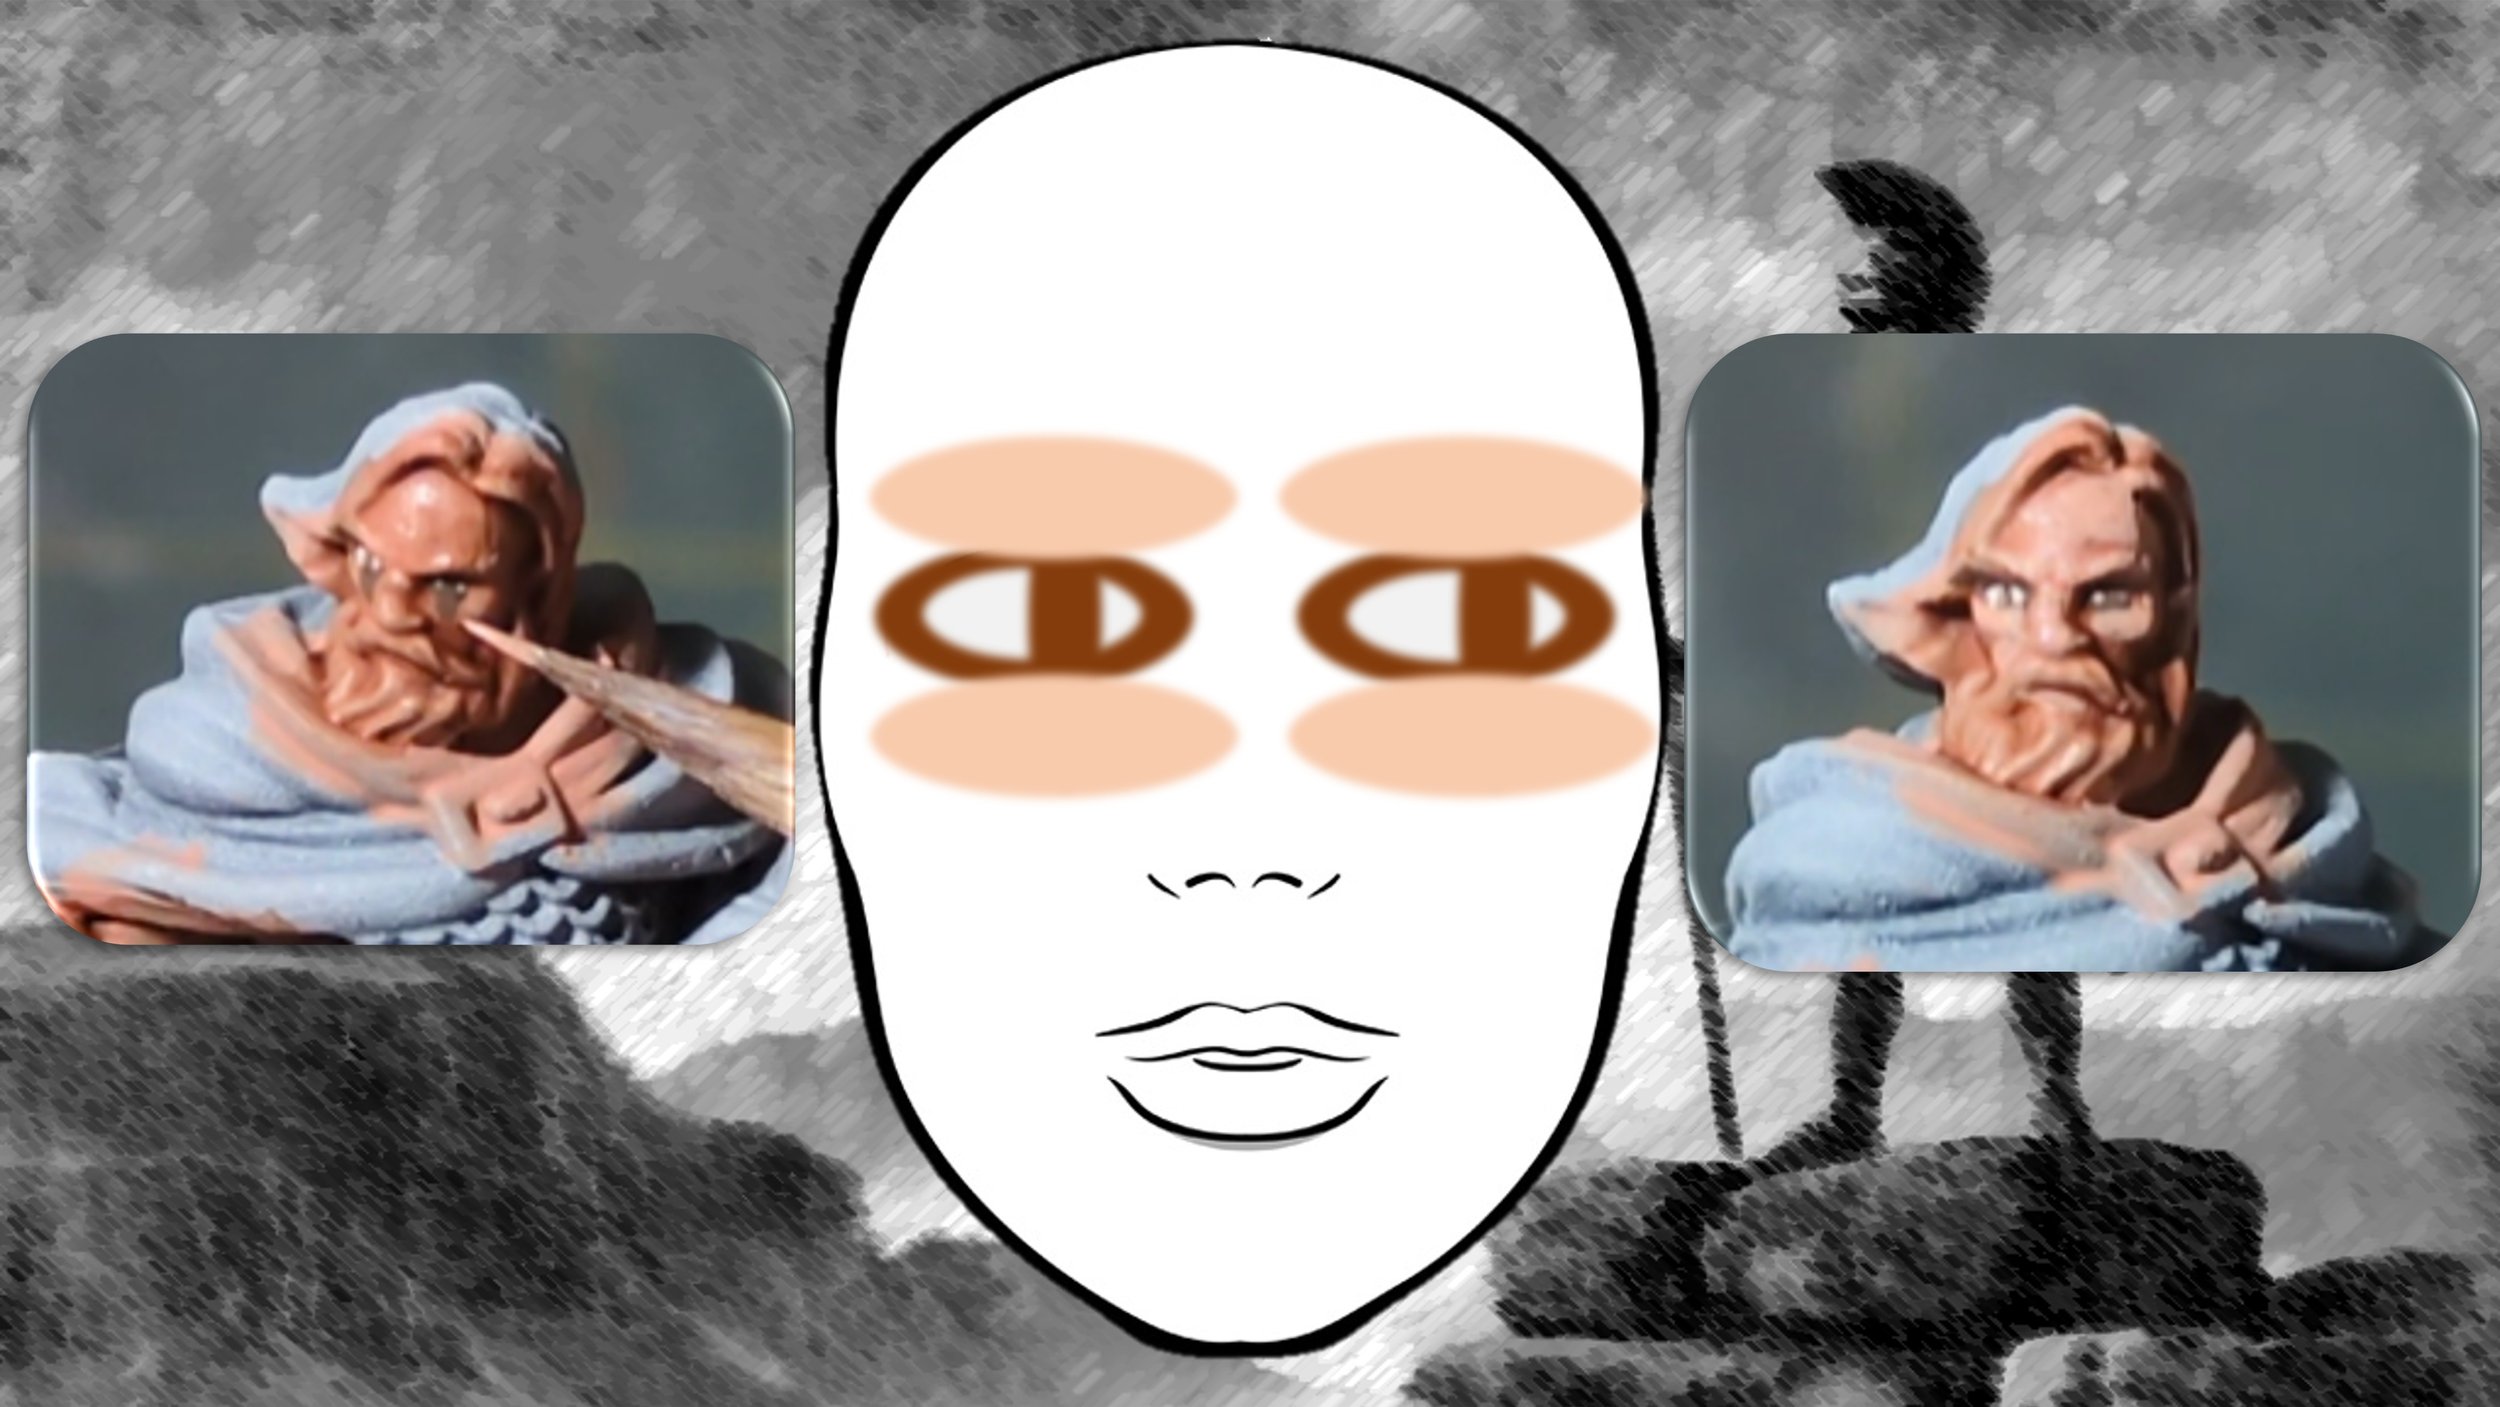
Step Three: Straight-line Iris!
This step is where I really have fun with the process, and where you have the opportunity to add some extra character to your minis. When I first started painting eyeballs on miniatures, I would always make them staring straight ahead. It was an understandable decision to make but, the more I looked at my minis, the more boring and unrealistic it looked. In real life, even when we are looking ahead, we are seldom staring with a perfectly centered gaze. Our head may be facing forward, but we are often staring slightly to one side or the other. Our miniatures look much more interesting if they are doing the same thing as well. In a moment I’ll explain an easy way to help you find the right position for your eyes to be staring.

This step of the process also allows you to get creative with your iris color. I, as a general rule, always paint my irises a dark brown color. This color just reads really well from a distance and doesn’t look as unrealistic as a vibrant blue or green might look. Simply put, it’s the lazy “good enough” pick for iris color. Now, for the painting process itself. We start this process off much like the previous steps. You’ll take your thin-tipped brush, add a little of your iris colored paint to the tip, adding some medium to the mix if you so choose. Now, rather than holding your miniature’s brow parallel to the brush, you’ll hold it perpendicular. You’ll now also have the opportunity to simulate where the iris will be painted before actually touching brush to face.
Holding the miniature up to the very tip of the brush, you will focus intensely on the tip of the brush and move the tip of the brush in front of the whites of the miniatures eyes, letting the brush tip simulate the iris itself. This will give you a picture of how that eye will be staring before actually putting the paint down. Once you find an interesting and compelling position for the eyes to be staring, you’ll gently touch your brush perpendicular to the whites of the eyes. If you did this properly, there will be a thin line running north and south across the whites of the eyes. If you didn’t get enough paint down, try again. If you got too much paint down, and you added medium to your paint, you can just wipe it off and try again.
If at this point you have a big ugly line running up-and-down across the brows and cheeks of your miniature, don’t panic! We’re going to clean all that up as we paint the miniature’s face. It’s at this point that your miniature probably looks most like a clown, but it won’t stay that way.

Step Four: Cleaning up Those Blotches and Lines with More Blotches!
For this step, we are going to begin the process of highlighting the face in order to clean up the sloppy eyeball painting of the previous steps. This article won’t cover how to completely paint the face, but perhaps a future article could be dedicated to that topic. For now, we are going to take the same base flesh tone (in my case, Scale 75 Pink Flesh), and paint some more blotches parallel to the brow.
Two of these blotches will actually *be* the eyebrows themselves. This step intends to establish the first set of highlights around the eyes of the face, in two logical and prominent spots: the brows, and the tops of the cheekbones. You’ll paint these blotches similarly to the irises of the eyes, only these will be horizontal rather than vertical, and will be slightly thicker.
At this stage, you can also be sure to use this initial highlight to clean up any of the spillover of the iris line, white eyeball, or brown eye socket colors that we’ve painted in previous steps. This initial highlight is critical to making all our sloppy work over the previous three steps look like it was the work of a classically trained painter.
Ok, let’s not get too carried away. This step will help hide your mistakes and seal the deal to produce what will ultimately be a set of perfectly decent miniature eyeballs.
I hope you have found some value in this article, be it learning a new technique to efficiently and repeatedly produce decent eyeballs on your miniatures, or to simply be empowered to make mistakes and clean them up later. That second lesson was truly the most liberating one for me upon learning this technique. I think, as miniature painters, we get too crippled by the fear of unachieved perfection. We need to learn to be ok with “good enough”, and we need to be ok with making mistakes and fixing them later (or not fixing them!). Most miniatures I paint look pretty terrible to me until they don’t, and that stage of looking “good enough” doesn’t usually come until a lot of slogging.
In closing, I’ll briefly get carried away again, this time with a high-minded reference to a great artist from the past. Michaelangelo Buonarroti, the famous Italian painter and sculptor of the Renaissance, was once asked about how he created such magnificent sculptures. He replied:
“The sculpture is already complete within the marble block, before I start my work. It is already there, I just have to chisel away the superfluous material.”
Unlike Michaelangelo, we are ultimately painting game pieces, not masterpieces.
So, when you look at an unpainted face on your miniatures, imagine that a perfectly decent set of eyes is already there and that, as you chisel away with a set of blotches and lines, you will eventually set them free.
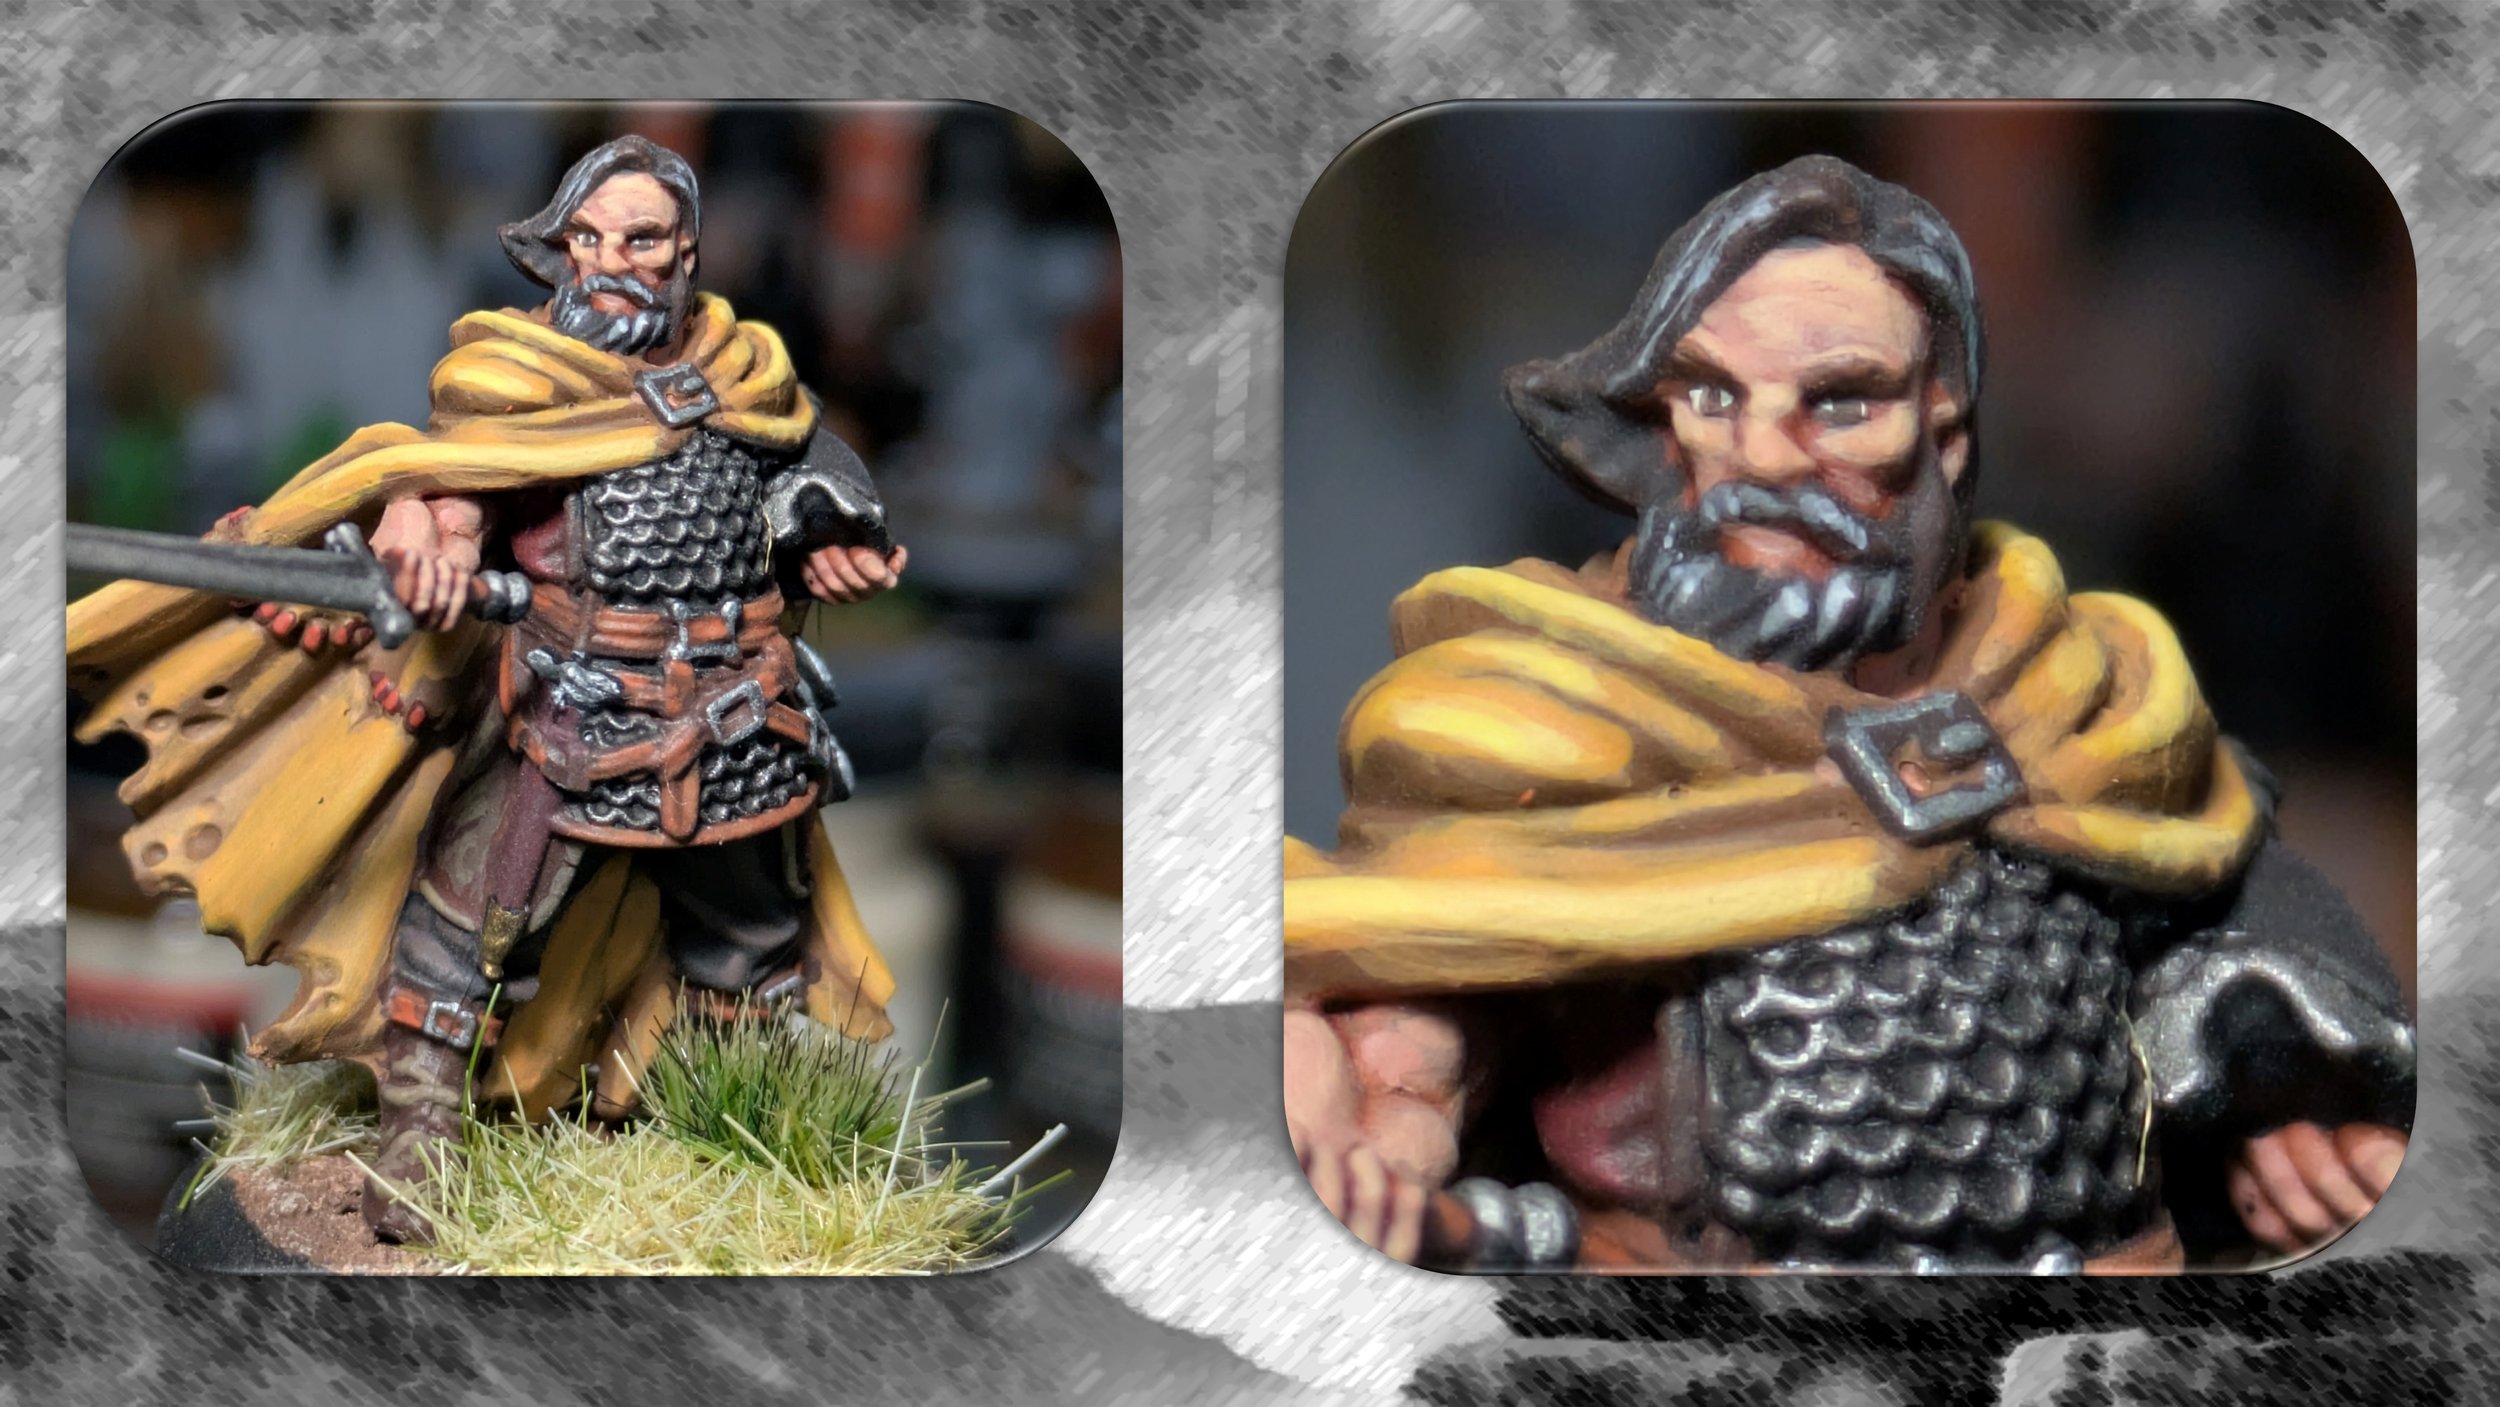
The finished product:
Some additional examples of the same technique used on other miniatures from the Brotherhood Without Banners faction of the A Song of Ice and Fire tabletop miniatures game:

